Tuesday, 24 November 2015

Database functions

DATABASE:
A database is a collection of information that is organized so that it can easily be accessed, managed, and updated.
Every table that we are creating will be stored in a database.
so to create , update and delete the database a set of keywords are used.
creation of database:
the database can be created with the keyword 'create database'.
syntax: 'create database database_name';
eg: 'create database customer_database;
deletion of database:
similary, a database can be deleted.
syntax: 'delete database database_name';
eg: delete database customer_database;
the above command will delete the database with name 'customer_database'.
TO ALTER THE FIELDS IN A TABLE:
to add a column to the table:
syntax: alter table table_name
add column data_type;
eg: alter table products
add area varchar(120);
and the above code results in:
and similarly the column in a table can be dropped also:
to delete a column from the table:
syntax: alter table table_name
drop column column_name;
eg: alter table products
drop column area;
and the above code brings the following result:
deletion of table:
the deletion of the table can be achieved by delete keyword.
syntax: delete table table_name;
eg: delete table products;
the keyword delete table products, deleted the table in the name of products and hence there is no, no of records in the table.

*****************************************************************************************


joins:
joins are used to combine rows from two or more tables.
there are a list of joins available in the SQL. they are:
-inner join. , this will return the matched rows of both the table if atleast one was matched.
-left outer join. - return all rows from left table and matched records in the right table.
-right outer join. - return matched records in the left table and all records in the right table.
-full join. - returns all rows from the left table and from the right table.
-self join - this is used to compare the values of the table itself
for testing the joins lets create two table customers and orders
customers (TABLE)
ID int(10)
LastName varchar(255)
FirstName varchar(255)
Address varchar(255)
City varchar(255)
orders (TABLE)
OID int identity(10)
customerid int(10)
amount int(10)
the syntax for creating above tables is:
CREATE TABLE customers
(
ID int PRIMARY KEY,
LastName varchar(255) NOT NULL,
FirstName varchar(255),
Address varchar(255),
City varchar(255)
);
CREATE TABLE orders
(
OID int IDENTITY(1,1) PRIMARY KEY,
customerid int not null foreign key references customers(id),
amount int
);
Let's consider the values of these tables as
table (customers):
ID LastName FirstName Address City
1 kumar kishore arumbakkam chennai
2 arul aravind choolai chennai
3 venu visali bommannali bangalore
table (orders):
OID customerid amount
1 2 2500
2 1 4510
3 1 100
4 2 800
5 3 250
6 1 9500

INNER JOIN:
THE CODING FOR THE INNER JOIN.
which gives us the following output
from the above output it can be viewed that as said earlier the inner join will get all the values when there is a match with a field both in common.
LEFT OUTER JOIN:
in the left outer join, the result will brings out all the values of the left table (i.e) customer table and if the value for the left table is not available with the right table (i.e.) orders then it will show the value 'null'for the fields.
as like below:
RIGHT OUTER JOIN:
in the right outer join, the result will brings out all the values of the right table (i.e) customer table and if the value for the left table is not available with the right table (i.e.) orders then it will show the value 'null'for the fields.
like this is same as the left outer join but in the opposite way.
the result will be as follows, in this ex, the orders table is having the foreign key in reference with the primary key of customers table and hence it doesn't have any values for customerid otherthan mentioned in the customers table.
FULL JOIN:
full join will put all the values of both the tables, and fills the column that doesn't have any values with 'null'.
self join:
self join is a special purpose join which is used to compare the table with same table by assuming it as a second table by temporarily giving it a name.
eg: for the self join, in which the employee id, employee name and employee under supvision was mentioned , the third field gives you the detail like that employee under control of whom.
the below table shows the view with the employee id, employee name and employee under supvision after entering the values.
the below view shows us that the employee was under whose control, for these purpose the self join can be used , but this uses the keyword of the 'left outer join', and this is called the self join as because the table is compared with the table itself.
sub query:
the sub query is the term araised as because this query was written inside the another query. like the search result of one query will be given as the input to another query to get the desired output.
THE OUTPUT CAN BE VIEWED @ http://sqlfiddle.com/#!3/93680/19
below mentioned the example of the sub query:
in this example we considered to find the third highest salary in the table for which the above sub query was retured which gives the value like
it actual gives the right value of the third highest salary in the table.
UNION:
The union keyword combines all the fields mentioned in the first and second table. the things that to be followed while using the union keyword is that the no of fields mentioned and the data types of the fields mentioned should be same. when doing that the fields of both the tables will be combined and will show us the result.
*********************************************************************************


Thursday, 15 October 2015

Step by Step Configuration of SAP ROUTER

SAP Router control and access the network from others. Simply SAP router is a port filter, it accesses the network secure manner. If firewall will block the all networks but some network not blocked by firewall. In this case firewall will allow the unsecure connection to the SAP system. So that SAP will recognize such type of malicious access. SAP will offer the router. Router is nothing but the find the best and shortest path to the user with secure manner. It’s the direct connection between the Local System to OSS.


SAP ROUTER


Step by step installation of internet Demonstration and evaluation system

Internet Demnostration and evaluation system is mainly used for practical purposes of SAP. Several business processes and all other examples of data are provided this pack. Here the step by step installation of SAP IDES. Lets start the installation.

1. Download the SAP IDES software from service market place.
2. Start the setup file from the Installation DVD.


3.Now loading SAP software.

4.Select the database prerequiste check for my case  i select the SQL database check


5.Select the instance type you want in my case i select three instance

6. Select the database of SAP 


7. If you want in your SAP system unicode , you select the unicode box.

8. Select the kernel file you downloaded.

9.Prerequisities checker overview. After completion of check you have to put the next button.


10. Now loading the installation prerequisities check.

11.After checking of prerequisties check results will display. Actuall it check the all required memory and hardware.

12.After completion checking system you have to choose the database and stack form the DVD.


13.Now select the parameter settings either custom or typical.

14. A popup message will appear then Give 0K --> This will get sign-out and sign-in. Then automatically SWPM will run with corresponding screen.

15.In this phase you need to put the SAP system ID and Desination drive

16. Set the FQDN for SAP system

17. Now  you select the kernel file from installation DVD .
18.Set the password for SAP all users. this is important step for setting password, Note carefully.

19. Next is user domain, select the domain for my case i will select the local domain.
20. Set the administrator password for windows and SAP.
21. Now you select the database instance which match the database and SAP system.
22. Now database will be created with SAP system.

23. Now again you select the domain and password.
24. Select the installation export DVD and password.
25. Now you select the SAP number data files to load the SAP applications

26. SAP will assign the required  memory to install.

27. Select the data file destination to install.
28. Select the temp memory file storage location.

29. Now select the SAP code page and number of parallel jobs to execute. Usually this vales are automatically selected values.

30. In this phase select the instance number both PAS and ASCS.

31.In this phase automatically selected the ABAP message server port.


32.Select the password for webadm.
33.Select the SLD destination and register the SLD. As per the requirement.

34.Now you select the secure storage indiual key.

35. Select the archives you want to upack, usually select all pack.
36.In this phase you have to select the DAA(Diagnostic Agent)
37.Provide the path to the SAP Cryptographic library.
38.Now you see the parameter overview for reference.
Done it.

39.All task are running for total 37 phases. Usually it takes 6 hours depends upon hardware and SAP applications.

****Lets start now SAP****


Wednesday, 14 October 2015

MS SQL Step by Step insatllations

          Microsoft SQL Server is a relational database management database which store the information and retrive the information whenver needed information, it may be in same computer or different computer with same network. Here i will show the step by step MS SQL Database installation with screenshot.I have downloaded 64 bit windows 2012 server r2 standard.
1.Download the latest level ms sql database from online supporting sql website.
Open and Click on the Setup button.


2.Now installation center eill open and goto next on installation


3.In installation phase now click on New SQL server insatallations


4. Now running setup support rules


5. Now You specify the product key for SQL server.


6.Now you see the license term please accept it.


7.Now Product updates shown click on next


8. Running insatallations setup files 


9. Installations setup files is going on.


10. After istallation setup files completed other screen like setup support rules, setup role, feature selection are come.


11. After completion of setup support rule it will come setup role and instance configuration. In this step is important you give the named instance. you have select the required feature.


12.Instance configuration 


13.Instance configuration part 2

14.Instance configuration please wait.


15. Now it asking the diskspace requirements, you have required space on disk.


16. Your configured server will shown like that below snap.

17. Now you select the database engine for your requirement, i select for sap ides server database.


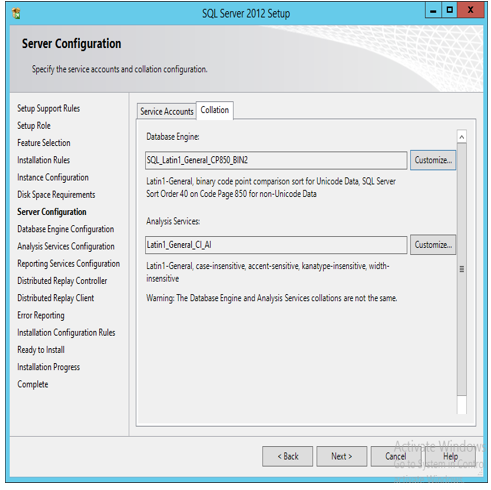
18. Now Server configuration phase going like that.

19.Enter database engine password in this case you enter the database password and windows password are same.


20. Now configure databse engine configuration path


21.Analysis the services configuration of database.


22. Analysis the services configuration of database.


23. Now datebas run for reporting servcies configuration phase.

24. Distributed replay controller.


25. Distributed replay client.

26. Error reporting services.


27. Installations configuration rules look like.


28. Now sql server going tobe ready to install look like.


29. Installation progress begin. it take some minutes to complete.


30. Installation process snap.


31. After installations complete look like.


All done , now you start the SAP insatallation.